HTML Map

Sunday, October 26, 2014

{Sorta} Spooky Black & White Halloween Fireplace

Hey there everyone!  It's a beautiful fall day here in the ATL.  My friends and I went to the Country Living Fair yesterday and had a great time.  That fair is so full of good stuff that it's hard to see it all in one day.  SO much inspiration!  We love it!

I fixed up my mantle a couple of weeks ago, but I'm just now getting around to sharing it with you.  It's simple and fun.


I use things from previous year, like the black feather wreath (which I LOVE! - got that at Kirkland's a couple of years ago), the skull (probably a Wal-Mart find), and the vase with black sticks. Every year I grab a few scraggly branches from our crape myrtles and give them a quick, black spray paint.


Easy, right?  The black candles used to be white and I sprayed them too.  I just use them again each year with those old candlesticks.  The little white pumpkins came from the dollar store and Wal-Mart, and I painted them white with some leftover spray paint after taping off the stems.  Easy.

Wednesday, October 15, 2014

A Brand New Look for the Blog!

Hi Everyone!

Just popping in to show off my new blog design!  I'm so excited - it's been in the works for a few weeks now and I'm so happy to share it with you!  Take a look around and let me know what you think~~  and check out Girl on Fire Design- Elle and I collaborated on the design and she put it all together :) Thanks, Elle!

Lots of gold and white with some black sprinkled in - Love!  And, I actually have other pages you can visit - I will be working on those in the days to come.

It sure has been fun posting projects and recipes here, but the most amazing thing that has come out of me starting a blog is definitely the people I have met.  I can't tell you how many cool women (and a few guys, too!) I have met since starting this little blog.  It has opened up a whole new world of folks to me, and I am so grateful for that!

So, thanks for reading Life at 818 and sharing this journey with me!


Wednesday, October 8, 2014

Fall Table Setting

I hope you're not tired of seeing my dining room!  Today I wanted to share my fall table setting with you~~  almost everything on the table is something I already had in my house.  I usually don't take the time to do a pretty table setting, so this makes me happy :) 


I just found the little birds and the feathers last weekend up in Braselton, GA, while thrift store shopping with my bestie.  The little birds have a burlap texture and are so adorable.


I'm Lovin Me Some Hometalk!

Hey everyone - it's been a very busy week around here!  My hubby spent this past weekend actually doing stuff in OUR house!  He's usually so busy working that it's hard to get projects done around here (unless I start nagging!).  He is upgrading the trim molding around the doors and windows, and the base boards in our master bedroom.. it's looking great so far and I can't wait to see it caulked and painted!  I'll be sure to share the progress here soon.


So do you ever go to the internet looking for inspiration for projects you want to do?  Yeah!  A lot of us do - we read blogs, search google, and pin stuff to Pinterest.. well I've recently discovered a really cool website called Hometalk.  Real people go to Hometalk and post their projects for everyone to see.  When you see one (or 100) you like you can "clip" it to one of your "boards."

If you have questions about a project you're thinking about or a problem with something in your house, you can post the question on Hometalk and people will HELP YOU.  It's awesome!  It's an entire community based on the Home.

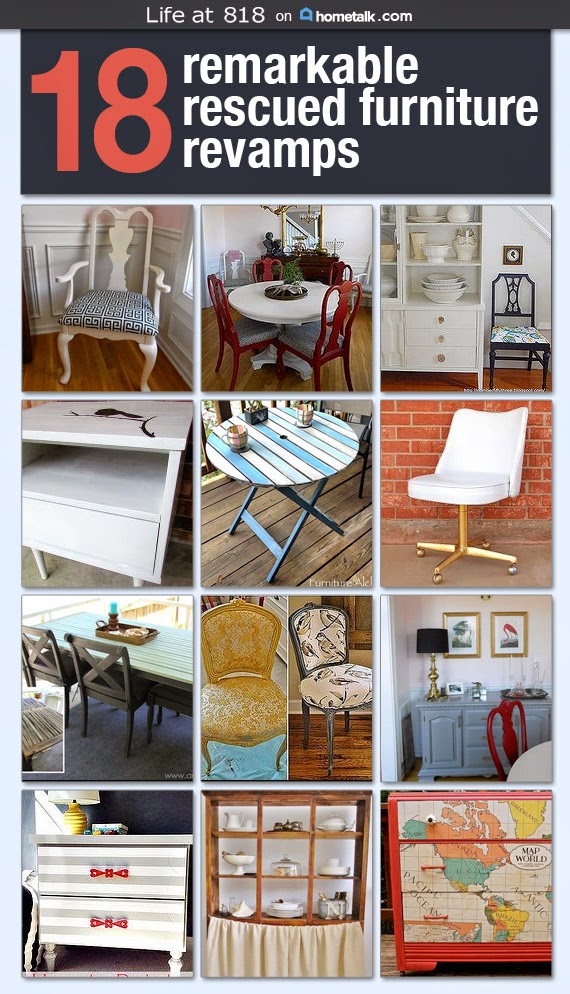
I recently painted my old, ugly dining room table and I thought it would be fun to make a board  featuring other projects where people took cast-offs and made them beautiful and useful again!  You can click on the picture below to see all 18 projects:

http://www.hometalk.com/b/3778272/furniture-rescues

Take a look at the fun projects I clipped to the board - I LOVE the gold and white chair! (I admit it - I have a thing for chairs).

Once you're there, go ahead and create a profile - it only take a couple of minutes and you're good to go, ready to start clipping awesome stuff!  If you like, you can follow me!  I'm just getting started so we can do it together :D

Hometalk is partnering with Explore Gwinnett to provide tickets to the Atlanta Country Living Fair this year!  (Oct 24-16) You can click here to read more about that and to enter for the chance to win them for you and a friend.

I'll be back later this week with a little fall stuff - aaaannnndddd I'm really excited.. I'm actually going to reveal a new look for the blog next week!!!  One hint... it's golden :)

Love ya!
Kelli

Monday, October 6, 2014

Country Living Fair {and a give-away!}

Ever since the very first year that Country Living Magazine hosted their CL Fair here in Georgia my best friends and I have attended.  They hold the Fair at Stone Mountain Park in a wooded area and it is absolutely the most fun thing to do - ever. {Below from left:  Joanne, Mary Kay, Me}


We usually meet somewhere for breakfast then head over to the Park.  We have the best time looking at all of the vendor booths - so many unique forms of art, jewelery, furniture, and of course antiques!


Last year our group of Atlanta area bloggers set up a time to meet with the folks from Hometalk.com and Country Living Magazine, and we got to meet Sarah Gray Miller - she was Editor-in-Chief of Country Living Magazine at that time!  She was super sweet!


By the way.. are you on Hometalk? Oh man, I LOVE Hometalk!  It is a great resource for decorating, renovation projects, and just about anything related to home.  And you can save the articles you like, kind of like Pinterest, but more detailed.  I'm a "Hometalker" - here's my home page..

Meeting up with other bloggers is always a good time for a photo op! Such a great group of women!


Brandi from Don't Disturb This Groove and me in front of the gynormous pumpkin display :)  I told you all how Brandi helped me with my fiddle leaf fig.. she's a gem.


This year Country Living Magazine has partnered with Explore Gwinnett, the Gwinnett County Tourism Board, to promote the Fair.  They are giving away free tickets!!  I am very happy to be able to participate and offer two weekend passes to one of my readers!  You should really check out their website - it's a great source for fun things to do in metro Atlanta~

http://www.gcvb.org/

Here's how to participate:

1.  Leave a comment here on the blog telling me why you want to attend the Country Living Fair.

2.  If you want another entry, hop over to Facebook and like my page - Life at 818!

The drawing will end at midnight on Sunday, Oct. 12.  I will put all your names in a hat and draw!  Simple!  I will notify the winner on Monday, October 13.  - DRAWING CLOSED.

Thank you, again, to Explore Gwinnett for sponsoring this super fun give-away!  Also, if you are coming from out of town to visit the Fair, you can find local hotel information here.

Hope to see YOU at the Country Living Fair at Stone Mountain Park!

UPDATE:  Congratulations, Ellen Krol!  You have won the two tickets to the CL Fair!  

Love,
Kelli

Wednesday, October 1, 2014

Just A Little Fiddle {Leaf Fig}

A few months ago I jumped on the fiddle leaf fig train and bought a small one for $10 over at Home Depot.  I have kept it in the dining room right in front of the window.  I was concerned about killing it (because basically i kill most plants) so I reached out and asked my Instagram peeps if they had any tips.


Brandi at Don't Disturb This Grove linked me up to a picture of her fiddle that she had shared on her Instagram - don't over water!  Look for the signs! She said "For my fiddle-leaf fig friends: See the droopy leaf on the left, that's when I know it's time for water. I wait for that signal and it's worked for me so far!" See her fiddle below - see the bent leaf on the left? 

http://instagram.com/p/kag7oijVaH/?modal=true


Wednesday, September 17, 2014

The Dining Room Table Update :: It's Done!

I talked about the beginning of this make-over on the blog here.. and now for the rest of the story...

As I lamented to a friend over a Facebook pic of my dining room table that it had taken almost 2 months to get this thing done, he sweetly reminded me that "oh, you know, you did have that foot surgery thing going on..but no biggie!"


And he was right.  I DID have some surgery on my foot which kept me off my feet for three weeks.  Nothing scary or anything, but I could not walk on my foot for three. whole. weeks.  I used a knee roller, or they also call it a scooter.  It's not real conducive to painting or any type of household DIY.  I was basically shut down.

Sunday, August 24, 2014

Crafty :: Map Pendant Necklace

I think I've said it before, but I'm not realllly a crafty person.  I have done some cool crafts in my day, but it's pretty rare because I usually just don't have the patience.  But last spring my best friends and I were on a girls-weekend shopping up in Blue Ridge, GA, when I saw an adorable necklace.


I loved it because it was a map!  I love, love, love maps and globes.  I love mapquest and google maps and bing - especially the "bird's-eye-view."  I'm just nerdy that way.  The cost of the necklace was way more than I was willing to spend on it - I thought "hey, I could make that!" and for a heck of a lot less...


Finally, a few weeks later I did a Google search and (after some good snooping) found what I was looking for.  An Etsy shop and website called Sun And Moon Craft Kits.  I ordered what i wanted from them and followed their directions and turned out three adorable necklaces, one for me and my two best friends.

I initially set up on kitchen table for making the pendant.  The website sells the glaze that you would use along with the chains, pendant trays, and clear domes.  You just have to decide what goes in them!  Really, the possibilities are endless.. pictures, fabric, playing cards, love letters, newspaper headlines, a four-leaf clover - anything that is flat and small enough to fit.  I used a map. (oh and apparently TV/Roku remotes are part of the process too...)


I identified the area of the map I wanted to use and just drew a circle around the dome to mark the spot.  I used the area of town where my friends and I live for our own personalized pendant.


Now, I won't go into all of the instructions - Sun And Moon gives really detailed instructions on their website.  The young lady who filled my order even talked with me via email on a couple of questions I had - she was super helpful.  One thing they did tell me that was very helpful, was to use packing tape over my image of the map.  Since the map paper is thin, the tape keeps the glaze from bleeding though the image.

And unfortunately I got SO INTO making them I did not take any pictures of actually making the pendant!!!  Although in my defense, both hands were pretty busy at all times and I was super worried I would mess it up.. but they came out pretty good!  After letting them set up and dry for a day, I moved on to adding them to the chains. 


I found some little antique-gold loops and a little bag of charms in just the right colors all on sale at Wal-Mart.  Working on a black tablecloth made this part much easier.  I used my small needle-nose pliers to open and close the loops.  I "fixed" the key and charms to one spot on the chain so they didn't get lost hanging behind the big pendant.


I really love how they turned out - and I always get asked about my necklace when I wear it!  That is so cool to me!  After I finished them I package them up and mailed them to my friends.  It was fun to send them a gift for no reason :) And now we have cute matching-yet-unique necklaces..  so. much. fun.


How about you?  Made any cool crafts lately?  This will probably be mine for the year..

(I was not compensated by Sun And Moon, I just bought the stuff from them and I liked them because they were helpful) 

Sharing over at That DIY Party!  

http://diyshowoff.com/2014/08/24/diy-party-21/


Love,
Kelli

Friday, August 8, 2014

Painting the Old Dining Room Table

Hello all!  I am excited to show you my latest project! When we blended households back in the summer of 2009 I threw a table cloth over this cheap table in the dining room and called it day.


I figured I would buy a new one in a few months and until then this guy was fine with the table cloth on it.  Well, you know the best laid plans...

We kept on using the ugly table....  But actually, it works really well!  It has two big leaves so it stretches to hold up to 12 people (albeit tightly) and it's sturdy.  Here it is last Thanksgiving all stretched out and gussied up!


I realized I probably couldn't replace it cheaply.  Too bad this one was just so ugly.  I mean, it's pressed board with some kind of plastic finish (??) and the edge is rubbery.. bleck!

I decided to go ahead and paint it.  I figured if it turned out awful then I was no worse off. I could still throw the table cloth over it, right?  And then save my pennies and buy a better one down the road.


My hubby took it apart and carried it to the garage. I started by just sanding the heck out of the top with my new Ryobi sander (he had to buy me one because his was at a job site.. oh well!) and that was pretty fun.  I used the sander the best I could on the base - it was a little bit tricky because of the tube-like design. The only real wood on this table is the very bottom of the base!


I wiped it off real well then started priming with Kilz.  I sprayed, let it dry for over an hour, then lightly sanded with a block sander.  Then I applied a second coat and repeated the drying/sanding.  I did this over one weekend.


The next weekend my hubby started painting with Rustoleum Heirloom White - the same color we used on the dining room chairs.  Well, some parts came out great, but others came out not so great.  I'm not sure if it was too hot or dry outside, but the top is very splotchy and uneven, and also very bumpy/grainy feeling.  We ran out of time and energy that weekend, then went to the lake with the whole entire family the next weekend.. and we haven't gone back to work on it.


We need to sand and put on a second coat.  He's thinking about getting a can of the Heirloom White and rolling the top?  Or maybe spraying it with his big sprayer like he did the dining room buffet.  Either way, it won't be getting done this weekend either... I'm having some dumb surgery on my left foot and won't be allowed to walk on it for three weeks. yay. -_-


So, here it sits.  Dining room's a mess.  Who knows... maybe I can just get him to finish it while I call out orders from the couch!  I can dream can't I??  hehe  Do you ever start a project and then just can't seem to finish it?  Do you walk by it every day and it drives you crazy?  **Heavy sighhhh**

UPDATE:  See the finished table here!

Sharing at That DIY Party - always a bunch of cool projects!

http://diyshowoff.com/2014/08/17/that-diy-party-time/?utm_source=feedburner&utm_medium=feed&utm_campaign=Feed%3A+blogspot%2FpuSM+%28DIY+Show+Off%29


Love,
Kelli

Friday, July 25, 2014

The BEST Summertime Soup :: Gazpacho

Y'all I have been loving this summer!  We have actually gone to the beach twice (this never happens in real life) and are going to rent a lake house for a weekend get-a-way for the whole family in a couple of weeks!  I am on cloud nine about that one - all the kids, and a friend if they want to bring one, under one roof for a couple of days - YAY!!!


Since we will be eating all of our meals at the lake house, I need to come up with some that will be easy to transport and that everyone would enjoy.  I know for sure I will be making one of my all-time favorite recipes for summer: an easy-to-make, cold tomato soup - Gazpacho.  There are probably many recipes out there on the web, but I like this one the best.  I found it in my Better Homes and Gardens magazine back in 1998 and have been making it ever since.


The page is soft and worn from the many years of taking it out of my recipe box, unfolding it and then re-folding it!  You see, I like easy.  I like recipes that you can make from regular things.. not too many fancy, hard-to-name ingredients.  And that's what this one is - super easy with things you can find easily at your grocery store :) It's so fresh tasting! Hope you like it as much as we do!

Gazpacho To Go
Better Homes and Garden Magazine
June 1998, pg. 219

Ingredients:
1 15oz can chunky Italian- or salsa-style tomatoes (I use Italian stewed tomatoes and cut them up)
2 cups quartered yellow pear-shaped and/or halved cherry tomatoes (I never get the pear-shaped,
     they're too expensive - I use grape!)
1 15oz can of chickpeas (garbanzo beans)m drained
1-1/4 cups hot-style vegetable juice or regular vegetable juice (I use the hot)
1 cup beef broth
1/2 cup coarsely chopped, seeded cucumber
1/2 cup coarsely chopped yellow and/or red sweet [bell] pepper (I like the yellow for the color!)
1/4 cup coarsely chopped red onion
1/4 cup snipped fresh cilantro
3 Tbsp. lime juice or lemon juice (I always use fresh lime juice)
2 cloves garlic, minced (and I always just use the minced garlic that comes in a jar! easy!)
1/4 to 1/2 tsp. bottled hot pepper sauce (I never measure this, I just shake it in - we like spicy)


To Make:
In a large mixing bowl combine all ingredients - cover and chill for at least 2 hours.  I usually make it and chill overnight to serve the next day.


Serve it as a side to a meal instead of a salad, or make it the main course.  This makes about 7 cups or 6 side-dish servings.


It is seriously so yummy - and so. stinkin'. easy.  So, do you have a favorite dish that you make in the summer?  I'm always looking for new easy recipes so do share!  And let me know if you make the Gazpacho, too!

Sharing over at That DIY Show Off Party!

http://diyshowoff.com/2014/07/27/diy-party-19/?utm_source=feedburner&utm_medium=feed&utm_campaign=Feed:


Love,
Kelli
Related Posts Plugin for WordPress, Blogger...