HTML Map
Showing posts with label spray paint. Show all posts

Wednesday, September 17, 2014

The Dining Room Table Update :: It's Done!

I talked about the beginning of this make-over on the blog here.. and now for the rest of the story...

As I lamented to a friend over a Facebook pic of my dining room table that it had taken almost 2 months to get this thing done, he sweetly reminded me that "oh, you know, you did have that foot surgery thing going on..but no biggie!"


And he was right.  I DID have some surgery on my foot which kept me off my feet for three weeks.  Nothing scary or anything, but I could not walk on my foot for three. whole. weeks.  I used a knee roller, or they also call it a scooter.  It's not real conducive to painting or any type of household DIY.  I was basically shut down.

Friday, August 8, 2014

Painting the Old Dining Room Table

Hello all!  I am excited to show you my latest project! When we blended households back in the summer of 2009 I threw a table cloth over this cheap table in the dining room and called it day.


I figured I would buy a new one in a few months and until then this guy was fine with the table cloth on it.  Well, you know the best laid plans...

We kept on using the ugly table....  But actually, it works really well!  It has two big leaves so it stretches to hold up to 12 people (albeit tightly) and it's sturdy.  Here it is last Thanksgiving all stretched out and gussied up!


I realized I probably couldn't replace it cheaply.  Too bad this one was just so ugly.  I mean, it's pressed board with some kind of plastic finish (??) and the edge is rubbery.. bleck!

I decided to go ahead and paint it.  I figured if it turned out awful then I was no worse off. I could still throw the table cloth over it, right?  And then save my pennies and buy a better one down the road.


My hubby took it apart and carried it to the garage. I started by just sanding the heck out of the top with my new Ryobi sander (he had to buy me one because his was at a job site.. oh well!) and that was pretty fun.  I used the sander the best I could on the base - it was a little bit tricky because of the tube-like design. The only real wood on this table is the very bottom of the base!


I wiped it off real well then started priming with Kilz.  I sprayed, let it dry for over an hour, then lightly sanded with a block sander.  Then I applied a second coat and repeated the drying/sanding.  I did this over one weekend.


The next weekend my hubby started painting with Rustoleum Heirloom White - the same color we used on the dining room chairs.  Well, some parts came out great, but others came out not so great.  I'm not sure if it was too hot or dry outside, but the top is very splotchy and uneven, and also very bumpy/grainy feeling.  We ran out of time and energy that weekend, then went to the lake with the whole entire family the next weekend.. and we haven't gone back to work on it.


We need to sand and put on a second coat.  He's thinking about getting a can of the Heirloom White and rolling the top?  Or maybe spraying it with his big sprayer like he did the dining room buffet.  Either way, it won't be getting done this weekend either... I'm having some dumb surgery on my left foot and won't be allowed to walk on it for three weeks. yay. -_-


So, here it sits.  Dining room's a mess.  Who knows... maybe I can just get him to finish it while I call out orders from the couch!  I can dream can't I??  hehe  Do you ever start a project and then just can't seem to finish it?  Do you walk by it every day and it drives you crazy?  **Heavy sighhhh**

UPDATE:  See the finished table here!

Sharing at That DIY Party - always a bunch of cool projects!

http://diyshowoff.com/2014/08/17/that-diy-party-time/?utm_source=feedburner&utm_medium=feed&utm_campaign=Feed%3A+blogspot%2FpuSM+%28DIY+Show+Off%29


Love,
Kelli

Wednesday, May 28, 2014

From Boring to Swanky! :: Dining Room Chairs Update

It's feast or famine around here folks.. I think you probably are used to it though, right?  I have so many things I want to write about, tell about, shout about! But the reality is that my life gets in the way sometimes.. ANYway.. I have good stuff to share!

I bought these chairs from the company where I work - they did a big re-decorating thing a couple of years ago and they sold them to me for $5 each.  (You really never know where you'll find your next bargain!) They have been living in my pink dining room..


They reminded me of my red dining room chairs so I thought they would be great companions!  I shared on 
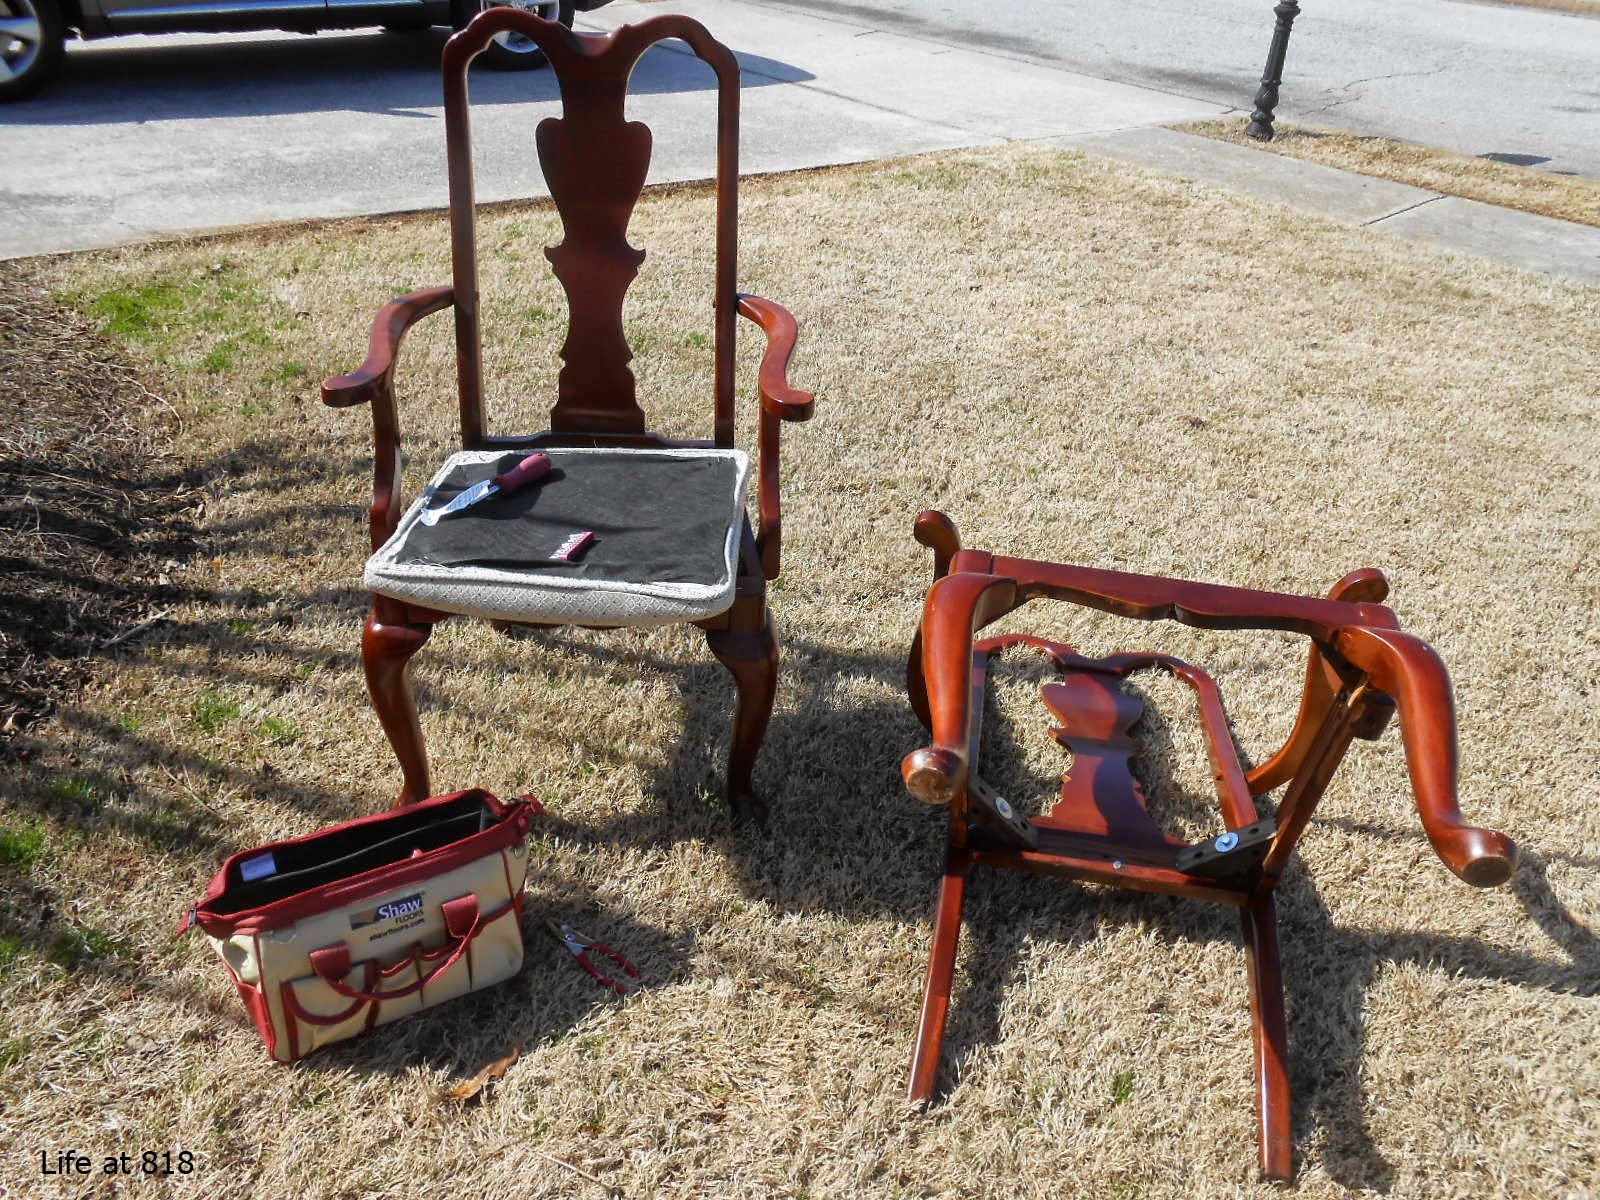
Instagram about finally starting to work on these dining room chairs back here... then, in late March we painted them. Of course I had to take them apart in the yard... with my Shaw Carpets tool swag from HAVEN Conference!


I roughed them up a bit with some steel wool pads, wiped them down real good, then Hubby primed them with Kilz, then painted them with Rustoleum's Heirloom White.


I went back and forth about painting them a bright white or a more creamy white.. in the end I went with the slightly creamer version of the Heirloom White because it matched the fabric to a T.
 
 Primed

Primed on the left, painted on the right

In the picture above the creamy white looks a little yellow-y, but it doesn't read that way in the house.

The fabric is Premier Prints Towers Onyx Natural from Online Fabric Store.  Last year I attended the HAVEN Conference for DIY Bloggers and Online Fabrics Store was a sponsor.  They gifted a yard of fabric and a yard of burlap to EACH attendee!  So generous!  And I'm finally using my gift on my chair seats :)  I just covered right over the old fabric using my hand-held staple gun.

 Old original fabric

When you're covering right over old fabric it is really the easiest thing - the hard part is getting the corners tight.  A friend taught me how to get a nice tight corner.  When you are stapling along the straight edges, staple right up to the corner on either side... (ugh, man hands!!)


Then, gather all of your fabric (and I leave a lot of fabric because you can always cut the excess off later) that is in between those last two staples on either side and pull it tight...


Then I put in three or four (or more if needed) staples over the folds in the material...


When you're finished the corners should be smooth with very little wrinkles.  I didn't like the way one of them looked, so I pulled the staples out and did it again!


I had plenty of fabric and I am seriously in LOVE with how they turned out!  Along with the chairs being finished, I also added a $10 faux sheep skin rug to my piano bench.  I love the warmth it adds to the room, along with that little touch of glamor. 


I am so happy that i finally got these guys finished!  I am looking for some cute red pillows for them, but not having luck finding exactly what I want.  I'm probably going to do some fabric shopping over at Online Fabric Store and just make them myself - that's always more fun anyway :)

One last before and after ~~~


I'm totally in love!  From boring to swanky! Have you ever painted chairs before? Or recovered chair seats?  Do you have special techniques that are tried and true?  Do tell!

Linking up with Thrifty Decor Chic! You have got to check out the great before & afters! And also over at All Things Heart & Home's Twirl & Take a Bow - :)

http://thriftydecorchick.blogspot.com/2014/06/june-before-and-after.html

http://www.allthingsheartandhome.com/2014/06/10/twirl-take-bow-1-link-6-blogs-5/


Love,
Kelli

Monday, February 17, 2014

My Family Gallery Wall

Hey I'm on a roll with blogging! Ha! actually posting once a week - woo hoo!  Today I just want to show you my gallery wall and how it's coming along. 

A couple of years ago I put these two things on the wall in the family room with the intention of adding to it. Well, you know what they say about good intentions :)


Okay, so not bad, but definitely not very exciting either.  I finally started adding to the gallery.  I took some pictures from another spot in the house and moved them over here.. and also took two of hubby's pictures and gave them a bigger frame with a mat, and hung those up.  I bought one white frame and stuck it in there to hold the space. (sorry for the blurry pic)


Now we're on a roll.  This is definitely more interesting and fun.  I had the two bigger pictures of hubby and his kids and one picture of us all to go along with the individual head shots of the kids.  I needed to balance it out and add more of my kids.

About a week later I figured out which pictures to print and frame.  I had a frame I picked up from Ross for about $5, but I didn't like the way you had to hang it.  It had two small holder thingies on the back and I knew it would end up uneven and driving me crazy.  I took some floral wire, which is very easy to bend, and ran it between the two holder thingies so I would be able to hang it on one nail.


I adjusted the wire and twisted it around itself to the length where when I hung it the nail wouldn't show.  MUCH easier to hang now.


I knew I wanted the white frame to be gold, and hold a very special picture, so I spray painted the frame and added a picture of my daughter, her husband, and their sweet little angel.


I am very happy with they way it's coming together.  A lot of people have tutorials on putting together a gallery wall, and they make a lot of sense.  But, I'm an impatient person so I didn't measure anything, I didn't trace my frames on craft paper to make a mock-up wall, I just started hanging.  I'm not saying that's the best way to do it, that's just the way I did it.  Absolutely if you feel you need to plan it more then you should.  As long as you are happy with the results, I think the getting there can be whatever works best for you.. :)

The wall is plenty big enough to add more pictures, but I really like to let it grow naturally.  I do not plan on it being two more years before I add to it this time. I'll be back with an update when I do.

I have another small gallery that I showed here, when I talked about my black doors.  I love them and want one in my master bedroom next!  Do you have any gallery walls in your house? I would love to hear about them!

Love,
Kelli

Sunday, November 17, 2013

A Tale of Two Lamps

Hello friends - hope everyone has had a wonderful week.. it's rainy/gloomy looking here in metro Atlanta, but I still have to go to the grocery store. Yuck, it's my least favorite thing to do...

Before I go I thought I would share a quick story about two lamps..  they used to live at the Goodwill and Saint Vincent de Paul stores, but now they have been adopted and live with us.  I think they're happy here, too, because they get a lot of attention and provide a much needed service - light!

Here they are, in my old, pre-pink dining room when they first got here..


First up is the $8 art deco blue... which came with that lamp shade that's up-side-down behind it...


And then we have $6 skinny 80s brass with the tallest harp in the entire world and no lamp shade....


Both were in pretty good shape and they both worked - the brass lamp has some bad spots on it and I toyed with the idea of painting it, so it sat around for a while.

Ms. blue had a great shape and the brass accents were cool with me, but I didn't like her color, so I used some spray paint..  I taped off the parts I wanted to keep and took her to the yard for a dose of black..


I found a lamp shade at Ross for $7 that matched the shape..  now she lives in our family room on the round table that hubby made years ago - and she's very happy. I had a skinnier lamp in that spot for a long time, and I really like the way she is heftier.  Yay for new lamp for a total of $15!!


Ms. 80s Brass just sat around for several weeks because I just didn't know if I wanted to paint her or not.. then I was at Target on my lunch hour last week (I frequently go to Target on my lunch hour and browse the Clearance end-caps - you never know what you're going to find!) and I found a beautiful black Nate Berkus lamp shade.  It looked like it had been bought and returned, and it was marked down to $7.49!!  I snatched it up so fast - like nobody's gonna pry this from my cold dead hands haha!  I knew it would be perfect for ms. brassy brass!  Well, when I put it on the lamp, the circle holder thingy was too big!!!


I had to figure out a way to make the shade work.. so I ask my hubs to fix it!  He had a roll of some high-temp rubberized stuff left over from his days working in the airline maintenance industry. He wrapped it around the socket and used a zip tie to hold it in place..  it works perfectly and you can't see it unless you're looking inside the shade :)


So I decided to leave her brass and now she is living in the prettiest room in the house - SHE'S AWESOME!!


I hope you've enjoyed this little story about two homeless lamps.  Remember, you too can find lamps and give them a new life, and do it much cheaper then buying new!

Love ya,
Kelli

Related Posts Plugin for WordPress, Blogger...